Category Archives: Uncategorized

How we use data to improve our product development

A few years back at Guestline, we decided to build our own payment integration, that we can offer to our clients with benefits to us and savings for the hotels.

The need for a new design

With the new integrations, we initially worked on the back-end part of the puzzle, but later on, we tackled front-end as well. Our current design had its glory days behind and we know we need to refresh it deeply. Let me show you a small part of the process, which is filling in card details in order to conduct a transaction. It happens when a client is making a reservation over the phone, and a receptionist is making an initial payment with given card details.
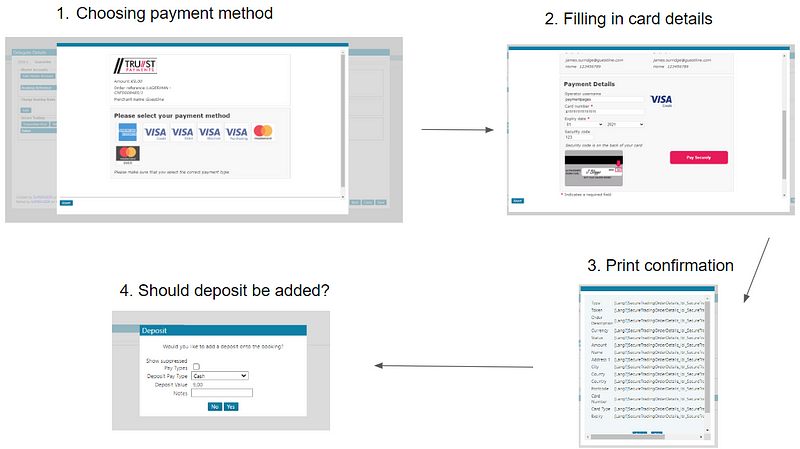
This design is far away from perfect and when it comes to the user experience it’s nothing that we came across in modern payment integrations. We knew that the first two steps could be merged together but what about the other two? Are they needed?

We need more data

We asked those questions to various people, starting from developers, through product owners and support, and ending with clients. What was the answer?

We probably don’t need this, but it has always been like that.

We knew we have to measure it ourselves and here is the part where we used Azure Application Insights. We added logging on every step to figure out how users use our application. This stuff can take time if you don’t have the data you need and you need to add measurements yourself. Nevertheless, after a few weeks, we had our answer.
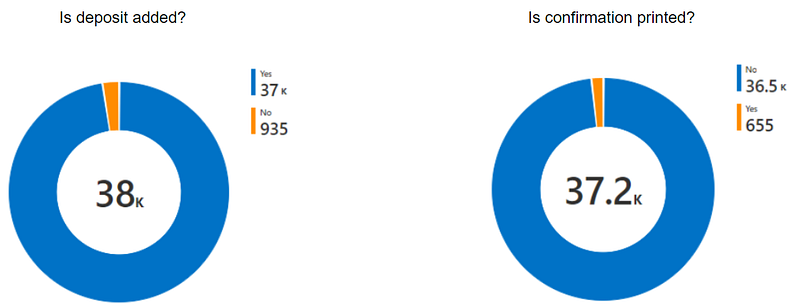
As you see, 97% of times deposit is added and 98% of times, the user doesn’t print the payment confirmation. At this point, we were almost certain that we can make those steps automatic, but we needed to ask those few percent a question.

Why do you use out payment integration like that?

We jumped into calls to our clients and found out, that mostly they just did it as a habit, without any specific purpose. Having that certainty we decided that now, our payment process could be vastly improved.
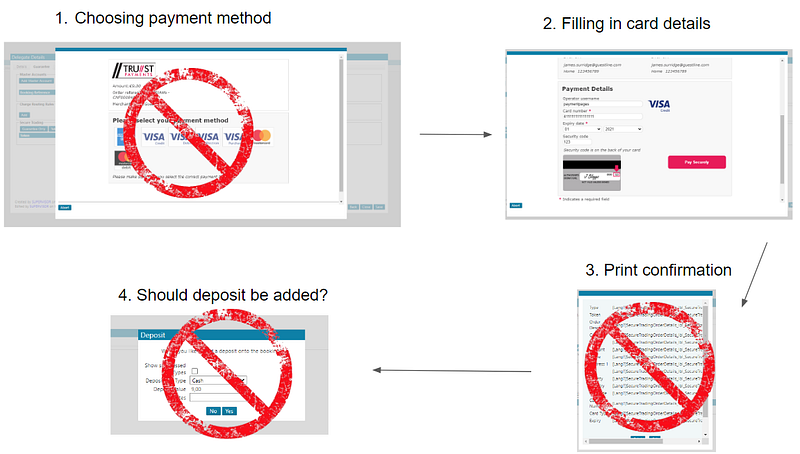
Now we can merge the first two steps and make the last two automatic. The next thing we did was improve on user experience when filling in card details. Here is how it looked before:
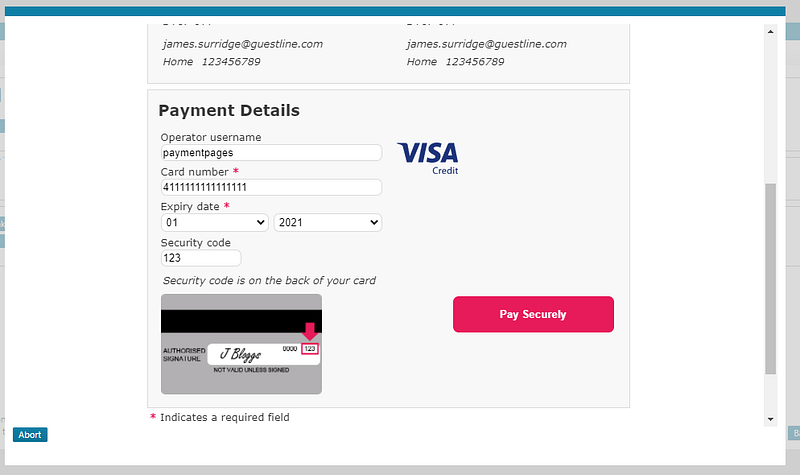
And now the GuestPay version:
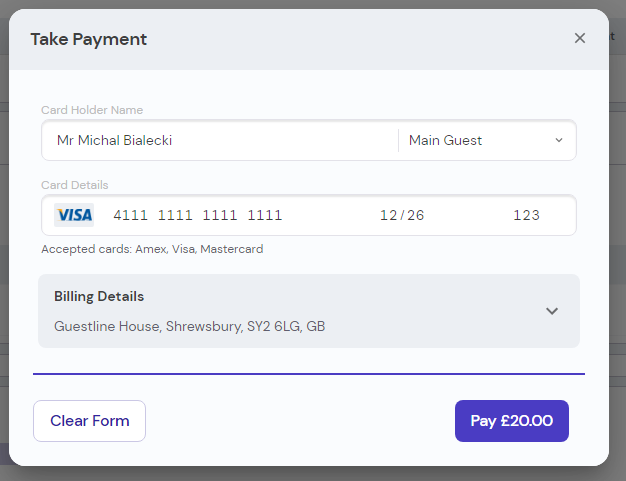
This is a single window that the user is going to see and the billing details will be prefilled from the reservation. The card type will be shown based on the card number.

Once the payment is completed, the notification will be shown to inform the user, that the payment was successful and the deposit will be auto-added.

Rolling out the change

Obviously, this is a massive change for the user, so it has to be introduced gradually. We introduced a feature toggle, that we can turn ON or OFF for each hotel separately. We started with just a few sites for a beta rollout and then based on users’ feedback, we added tweaks to the product.

We also put stress on how intuitive the new payment integration is and if the users can complete the payment without confusion or any guidelines from our side. We wanted to minimize the need for training and a potential rise of support calls regarding payments. This is really important when having around 4000 hotels using our product. Any confusion can bring hundreds of support calls, which we really don’t want to generate.

Once we had that confidence that the process works, we could switch more hotels and monitor how users use it. That is also the part where Application Insights came in handy. One of the metrics that were important for us is pay process duration.
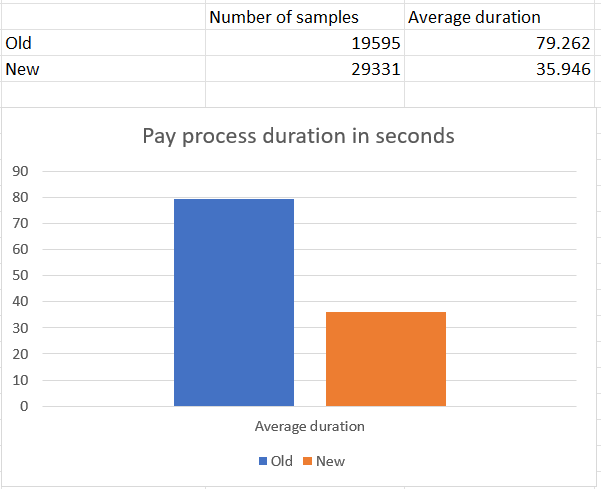
We were able to reduce the pay process by half! From 79 seconds to 35 seconds on average. If we multiply that by the number of payments, we get 44 seconds * 29331 = 1290564 seconds, that’s over 358 hours every 7 days.

We were able to save over 51 hours of guest time every day.

That’s 51 hours of receptionist time that can be used to serve guests and 51 hours of guest’s time not spent on a call to the hotel. With hotel difficulties in hiring staff, every process that can be sped up or made automatic is essential.

Summary

When introducing a change in the legacy system, data collection is crucial. You can ask your clients for feedback but that would always be subjective. Statistics don’t lie, but you need to ask the right questions and interpret them correctly. Remember that a man with a dog has on average 3 legs each.

Gathering data to guide development change will improve your product utility. Getting feedback from the client is one of the hardest things to achieve, but with the proper measurements, you can generate that feedback yourself. This could answer the question of whether a change is progressing in the right direction or give you a hint of what needs to be closely looked at.

Building a bond with the company while working 100% remotely

My name is Michał and since I joined Guestline, back in 2019, I am working 100% remotely from my attic in Zalasewo in central Poland. This is my first remote job and frankly, I wouldn’t change it in any way. Today I feel a part of Guestline and I developed strong relationships with many of my colleagues despite the fact we saw each other in person just a few times.

Remote work is ingrained in Guestline

Guestline Ltd. is a British company, established in the middle-sized town of Shrewsbury over 20 years ago. It grew steadily developing its hospitality software and today it employs over 200 people, with 100+ working from home. A couple of weeks ago I asked my teammates to pin their workplaces on the map. Here is the result:

It turns out, that we are spread all over Europe and beyond! In my team of 10 people, we have daily meetings from Poland, Germany, England, Spain, and Gibraltar!

Most of us work remotely, even from towns that have a physical office. It’s your choice. If you are comfortable with working remotely, you can do it. Maybe that’s why getting used to the new normal wasn’t that big of a deal when the Pandemic happened. It was much harder for our customers, that had to close their hotels, but for us, mostly working from home — nothing changed.

There’s always time for a chat

In Guestline we tend to have a pair programming or mob programming session whenever needed. Those sessions are held in our Teams team channel so that everyone can participate. Some might think it’s a waste of time, but I have other observations.

Chewbacca team “stand-up” meeting

Working together actually solves problems faster, because more heads are involved. You get instant feedback and a brainstorming session is happening automatically. This results in fewer comments on the pull requests and faster feature development.

Also in every session, you share competencies across the team, because you can get involved in a topic that you have no experience with. With guidance from the team, you can complete the task faster and dispel any doubts.

This approach is great for the onboarding process. When a new team member is joining, he or she needs to learn a lot and get to know as many people as possible. Teams chats with cameras on, while working on a task, are perfect for that. Then you can switch after an hour, so the other person shares a screen and gets his hands dirty.
Spend time together

One of the good ideas that we introduced to our daily routine is to have an ice-breaking question at the beginning of the stand-up. One of the team members comes up with a question and we answer it one by one. Here is an example:

If you could learn one new professional skill, what would it be?

You could get answers like woodworking, bass guitar playing, or chemistry and as a result, you are slowly starting to get to know your colleagues. This practice is a starting point for chit-chatting while working. I must admit that through those sessions I developed strong relationships that are not based purely on work.

Me 🙂

Meet in person once in a while

Despite working remotely, we do meet a couple of times a year. Once every year there is a whole company get-together in Shrewsbury. The idea of this meeting is not only to see each other in person but especially to talk to each other. We have a rule that you have to talk to as many people as possible and learn a bit about his or her work. And you should not use your laptop for the whole day!

Guestline summer meeting

I was amazed at how many people I knew just from Teams calls or chats and that I was able to talk to everyone like a distant uncle and find out how much we have in common.

Apart from the big meeting, we have smaller ones in Poznań or Shrewsbury, with fellow Labs members, where we go out for something to eat and a beer.

For me, working remotely blurs the difference between countries, cultures, or weather, because in the end we all use English and work as one development team. This is a great example of how the Internet and Guestline bring people together from all around the world.

Summary

People are sociable creatures, we need each other to grow. We are not robots to solve tasks as soon as possible, we need appreciation, motivation, and a feeling that we belong somewhere. If an organization sees it and gives space for non-task-solving activities, pair programming, and chit-chatting, then it makes it possible. I think Guestline does it well.

5 free online games you can play with your team

Most developers love playing games and some of them still enjoy it after work. Some companies organize regular social events and get-togethers to have fun. However, when pandemic started we mostly worked remotely and organizing a social event was simply impossible.

In my company we started something called a fun hour, where we regularly play online games together. All of them can be played freely, but some of them offers payed subscription with more options. I’m sure you’ll like them! 

Gratic.io

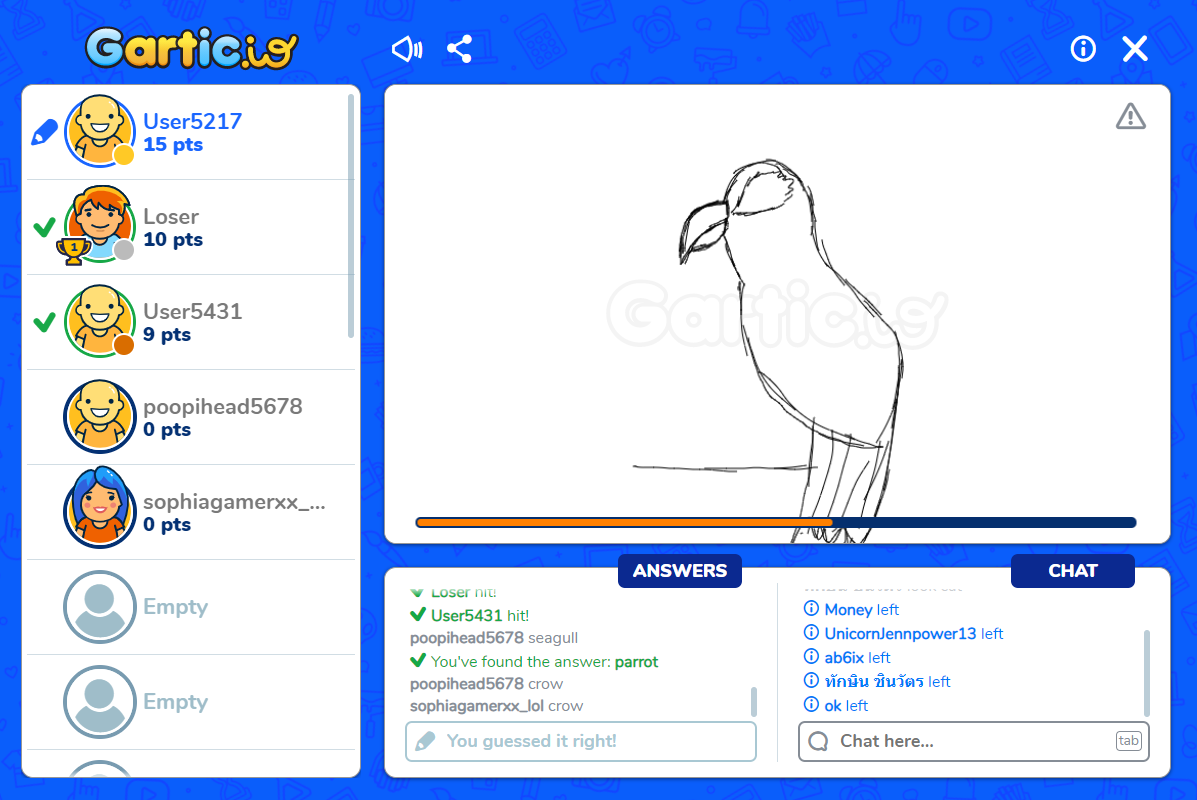
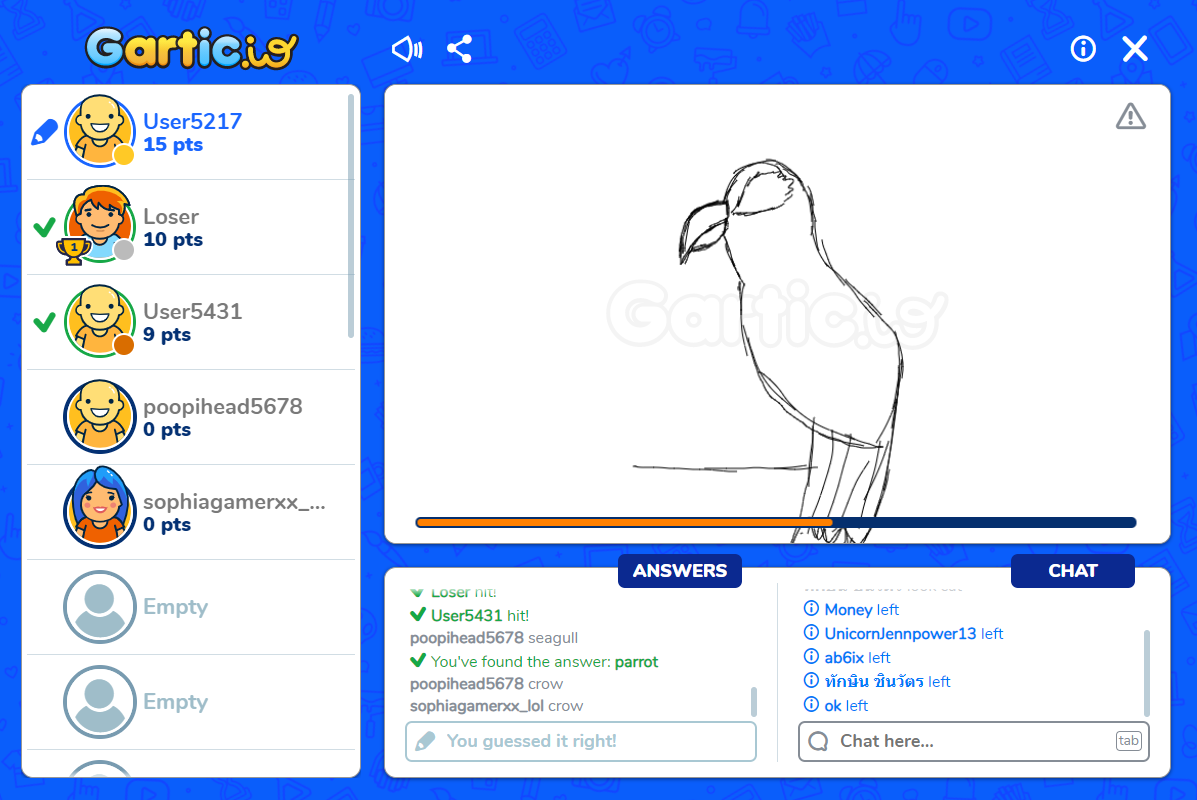
Gratic.io is a fun and completely free online game. You take turns and draw one of the two words proposed by the game. Other players need to type in the works and guess what the picture represents.

Words can be really simple, like a parrot in this case, to really hard one, like baseboard. You can create a private room for your team and play together. We also like to have a Teams call in the background, so we can comment and laugh together. 

Link: https://gartic.io/

Soldat

Soldat is a very intense, 2D, multiplayer shooter. You choose one of the publicly available map and play in one of the available game modes (capture the flag, deatmatch, etc.). Graphic is very simple, but it is the physics of the game that makes it feel realistic. Game is very engaging, but blood and flying body parts isn’t for everyone.

In my team, we usually divide into two sub-teams and play capture the flag mode. With Teams call in the background we can communicate freely and divide responsibilities and tasks to team members. 

I like Soldat very much, but there are two downsides of this game. First one is, that you have to install it on your machine and that could be a problem on your company’s laptop. The second one is that you cannot create a private map for your team (at least in the free license), so there might be other players joining.

Link: https://soldat.pl/en/

Among Us

This is a simple game, where many people can play, but only one two players are imposters and other teammates needs to find out who they are. The team needs to fix the spaceship by completing simple tasks placed on the map. Imposters needs to kill team members one by one without getting caught. Everytime a dead body is found, the team decides who is the imposter and if they agree – he or she is kicked out.
 

The most funny part of this game is the discussion that leads to kicking someone out. You either need to prove you’re not the imposter or fake it really good.

Link: Among Us

Curve Fever

This is a very simple, 2D arcade game. It resembles me a snake, but in a multiplayer version. Every player leaves a wall and need to drive carefully to omit all the walls. 
 
 
I think you can already tell, that in this game practise makes perfect. 
 

GeoGuessr

 
This is an original game, where you need to spot a place on the worlds map just by exploring a place in a google street view mode. You have a maximum of 2 minutes on every photo to pick the nearest location. After everyone finishes, you will be ranked by how good you spotted the place.
 
 
This is an engaging, but slow paced game. I have to admit that this is one of my favourite games as I like to travel and explore new places. Somehow it doesn’t get boring and we play it almost every time. 


Summary

I hope you liked my selection of multiplayer games, that you can play with your teammates. How did you like it? Maybe you are enjoying different ones? Please let me know 🙂


Practical differences between C# vs Vb.Net

For around a year and a half, I’ve been working with a project that was initially written in Vb.Net, but now newer code is written in C#. It’s a great example of how one project can be written in two languages, and code in Vb.net can reference C# and the other way round.

Vb.Net and C# are very similar and are compiled to the same Intermediate Language, but I found some differences more surprising than the others. 

Simple differences

Let’s start with the obvious things. Vb.Net uses simple English in its syntax, while C# uses C-based syntax. Let’s have a look at the example.

    private string ReplaceAnd(string s)
    {
        if (s != null && s.Contains(":"))
            return s.Replace(":", "?");

        return s;
    }

And now the same example in Vb.Net:

    Private Function ReplaceAnd(s As String) As String
        If s IsNot Nothing And s.Contains(":") Then
            Return s.Replace(":", "?")
        End If

        Return s
    End Function

It took me some time to get used to declaring types with As keyword. Also If statement needs Then, but those are the things you write once or twice and it becomes a habit.

In my opinion, the biggest changes when comparing C# with Vb.Net are:

  • we don’t use brackets for code blocks
  • there is no need for semicolons at the end of the instruction
  • variable names are not case sensitive
  • and a few more 😃

&& vs And vs AndAlso

All those simple differences are just differences in the language, but basically, code stays the same. One of my biggest mistakes when I wrote Vb.Net code was using And as && operator in C#. The thing is that they are not the same.

Let’s have a look at the example. I’ll use two methods that check for null in the If statement and do a replace.

    Private Function ReplaceAndAlso(s As String) As String
        If s IsNot Nothing AndAlso s.Contains(":") Then
            Return s.Replace(":", "?")
        End If

        Return s
    End Function

    Private Function ReplaceAnd(s As String) As String
        If s IsNot Nothing And s.Contains(":") Then
            Return s.Replace(":", "?")
        End If

        Return s
    End Function

The difference between And and AndAlso is that:

  • And will check statement on the right side even if the statement on the left side is false
  • AndAlso will not check the right side statement if the one on the left is false

To show it clearly I wrote unit tests:

    <TestCase("abc:d", "abc?d")>
    <TestCase(Nothing, Nothing)>
    Public Sub AndAlsoTest(toReplace As String, expected As String)
        ReplaceAndAlso(toReplace).Should().Be(expected)
    End Sub

    <TestCase("abc:d", "abc?d")>
    <TestCase(Nothing, Nothing)>
    Public Sub AndTest(toReplace As String, expected As String)
        ReplaceAnd(toReplace).Should().Be(expected)
    End Sub

And the results are:

AndTest fails, cause And operator check both left and right side, which causes a NullReferenceException. So if you want to check for null in the If statement and do something else as well, just use AndAlso.

Enforce passing a variable by value

Maybe it’s not a very significant difference, but I was surprised that it can be done.

Let’s have a look at a simple code and two tests:

    <Test>
    Public Sub AddTest()
        Dim a As Integer = 5

        Dim result = Add(a)
        a.Should().Be(6)
        result.Should().Be(6)
    End Sub

    <Test>
    Public Sub AddByValueTest()
        Dim a As Integer = 5

        Dim result = Add((a))
        a.Should().Be(5)
        result.Should().Be(6)
    End Sub

    Public Function Add(ByRef x As Integer) As Integer
        x = x + 1
        Return x
    End Function

We have a simple Add method, where we increment a given value by 1. We pass this variable by reference, so it should be changed as well.

Notice that in AddByValueTest we pass (a) and this is the way how we can pass a variable by value. Note that it only works for value types.

And the results proves that it really works like that:

Converting enum to string

This difference stunned me when I saw it and it was a final motivation to write this post. I was doing a refactoring around Vb.Net with converting enums and my colleague was doing a review of the task and said.

– Hey, cool refactoring, but I’m afraid it might not work. – said the colleague.

– Really? I run that code and it was fine. – I said.

– You might want to check that again, I even wrote a unit test, to be sure. – said the colleague.

Let’s have a look at this test. I’m converting an enum to a string.

    public enum ProfileType
    {
        Person = 1,
        Company = 2
    }

    [Test]
    public void ConvertEnumTest()
    {
        Convert.ToString(ProfileType.Company).Should().Be("2");
    }

And when you run it, it fails, my colleague was right. 😲

However, I was suspicious and the code I wrote was in Vb.Net, not in C#, so I wrote another test. But this time in Vb.Net.

    <Test>
    Public Sub ConvertEnumTest()

        Convert.ToString(ProfileType.Company).Should().Be("2")

    End Sub

And you know what? It passes!

So my original code was correct. However, Convert.ToString() on an enum works differently in Vb.Net and C#.

Summary

Working with Vb.Net sounds like going back to the middle-ages, but in fact, I got accustomed to the Visual Basic syntax quite quick. The capabilities of both are very similar, cause it’s still the same code underneath, but I found C# slightly more concise and more intuitive as well. Maybe it’s because I preferred C++ over Pascal in school 😁

There are differences, as you saw in this article, but they do not interfere with your daily work.

I hope you like this post, have a good day! 😊

Refactoring with reflection

There are often times when you need to do a refactoring, that Resharper cannot help you with. In my last post I described how regular expressions can be useful: Static refactoring with Visual Studio regular expressions

This time the case is different and simple replacement would not work in this case.

The default value for a property

I came across the code, where the DefaultValue attribute was heavily used, but actually, not like it should be. The DefaultValue attribute provided by the .Net Framework is useful for code generators to see if the property default value is the same as the current value and if the code for that property should be generated. I don’t want to get into details, but you can have a look at this article for more information.

In my case, I needed to change all the default values to assignments of properties when the class was created. The problem was that this class had more than 1000 properties like this and doing it manually would not only take a lot of time but could potentially introduce bugs.

Let’s have a look at the sample code:

    public class DefaultSettings
    {
        public DefaultSettings()
        {
            // assignments should be here
        }

        [DefaultValue(3)]
        public int LoginNumber { get; set; }

        [DefaultValue("PrimeHotel")]
        public string HotelName { get; set; }

        [DefaultValue("London")]
        public string Town { get; set; }

        [DefaultValue("Greenwod")]
        public string Street { get; set; }

        [DefaultValue("3")]
        public string HouseNumber { get; set; }

        [DefaultValue(RoomType.Standard)]
        public RoomType Type { get; set; }
    }

This is where reflection comes in handy. I could easily identify the attributes on properties for a given type, but how to change that into code?

Let’s write a unit test! A unit test is a small piece of code that can use almost any class from the tested project and what’s the most important – can be easily run. 💪

    [TestFixture]
    public class PropertyTest
    {
        [Test]
        public void Test1()
        {
            var prop = GetProperties();

            Assert.True(true);
        }

        public string GetProperties()
        {
            var sb = new StringBuilder();

            PropertyDescriptorCollection sourceObjectProperties = TypeDescriptor.GetProperties(typeof(DefaultSettings));

            foreach (PropertyDescriptor sourceObjectProperty in sourceObjectProperties)
            {
                var attribute = (DefaultValueAttribute)sourceObjectProperty.Attributes[typeof(DefaultValueAttribute)];

                if (attribute != null)
                {
                    // produce a string
                }
            }

            return sb.ToString();
        }
    }

It’s a simple test that just runs GetProperties method. This method fetches PropertyDescriptorCollection that represents all properties in DefaultSettings class. Then for each of those, we check if they contain DefaultValueAttribute. Now we just need to somehow generate code for every property and write it to StringBuilder. It’s actually simpler than it sounds.

Let’s check how code will behave differently for enums, strings, and other types:

public string GetProperties()
{
    var sb = new StringBuilder();

    PropertyDescriptorCollection sourceObjectProperties = TypeDescriptor.GetProperties(typeof(DefaultSettings));

    foreach (PropertyDescriptor sourceObjectProperty in sourceObjectProperties)
    {
        var attribute = (DefaultValueAttribute)sourceObjectProperty.Attributes[typeof(DefaultValueAttribute)];

        if (attribute != null)
        {
            if (sourceObjectProperty.PropertyType.IsEnum)
            {
                sb.AppendLine($"{sourceObjectProperty.Name} = {sourceObjectProperty.PropertyType.FullName.Replace("+", ".")}.{attribute.Value};");
            }
            else if (sourceObjectProperty.PropertyType.Name.Equals("string", StringComparison.OrdinalIgnoreCase))
            {
                sb.AppendLine($"{sourceObjectProperty.Name} = \"{attribute.Value}\";");
            }
            else
            {
                var value = attribute.Value == null ? "null" : attribute.Value;
                sb.AppendLine($"{sourceObjectProperty.Name} = {value};");
            }
        }
    }

    return sb.ToString();
}

For an enum, we need to provide a name with namespace and an enum value after a dot. For strings, we need to add apostrophes and for nullable types, we need to provide null. For others – we just assign the attribute value.

Are you curious if that would work? 🤔

Not too bad, not too bad at all 🙂 

If I paste that into my constructor, it will look like this:

    public DefaultSettings()
    {
        LoginNumber = 3;
        HotelName = "PrimeHotel";
        Town = "London";
        Street = "Greenwod";
        HouseNumber = "3";
        Type = PrimeHotel.Web.Models.RoomType.Standard;
    }

Guess what? It works!

The summary

Reflection is not considered as the best practice but it is a very powerful tool. In this example, I showed how to use it and invoke that code in a very simple way – as a unit test. It’s not the code that you would commit, but for a try and error process, it’s great. If you came across a manual task like this in your code, try to hack it 😎

I hope that you learned something with me today. If so, happy days 🍺

Don’t forget to subscribe to the newsletter to get notifications about my next posts. 📣


Static refactoring with Visual Studio regular expressions

Regular expressions are a multi-tool in every developer toolbox. One of the places they can be useful is Quick Find and Quick Replace dialogs in Visual Studio. In this post, I’m going to show you how you can use the power of regular expressions in smart refactoring.

Changing an enum to string

Let’s assume I’d like to change an enum to a string in my application, cause I realized that this property can include a value that the user added by hand and cannot be predefined. Let’s have a look at this enum:

public enum EventType
{
    Unknown = 0,
    Concert = 1,
    Movie = 2
}

Now let’s try to find all the usages of this enum. For that task, I’m using a Quick Find in Visual Studio, Ctrl + F.

Have you noticed a blue rectangle in a Quick Find dialog? It is an option to search with a regular expression. Let’s enable that and switch to the Quick Replace dialog. You can do it with the toggle on the left side or with the Ctrl + H.

I entered EventType\.(\w+) expression that means, that it will start with a EventType string, then a regular dot, which I must escape with \. Next are parenthesis, which means that I’m starting a subexpression group, and /w+ will match a word character one or more times. I’m going to replace it with "$1", which is a standard quotation mark and $1 is a reference to the first group.

And the result is really good:

We can refine this expression a bit and add a name for a group.

By changing (\w+) to  (?<entryType>\w+) we have given a name to the results of this group. We can use it in the Replace With input.

Summary 

Creating a regular expression is a try-and-error process, where you would need to refine your expression a couple of times until it matches what you need. However, it can be really useful and with a manual job like that, can save a lot of time.

I hope that you learned something new today and if so, happy days! 💗 

Returning more than one result from a method – tuple

Have you ever had a case, when you needed to return more than one parameter from a method? There are a couple of ways to cope with that and tuple might just be what you need.

The problem

Let’s look at the code, where we parse transaction data just to show it on the screen. We have a separate method for that GetTransactionData

string Data = "Michał;Breakfast;59;2021-02-13";

var value = new TupleExample().GetTransactionData(Data, out string customer);
Console.WriteLine($"Customer {customer} bought an item for {value}");

public class TupleExample
{
    public decimal GetTransactionData(string data, out string customer)
    {
        var chunks = data.Split(';');
        customer = chunks.First();

        return decimal.Parse(chunks[2]);
    }
}


And here is the result:

Possible solutions

There are a couple of ways we can approach this. The one that I proposed in the beginning, passing additional return values as out parameters seems to be the worst one. Nevertheless, I saw this construction more than once and there are certain cases it might be useful. For example:

var isSuccess = decimal.TryParse("59,95", out decimal result);

Another approach would be creating a new class to return the result, that might look like this:

var transactionData = new TupleExample().GetTransactionData(Data);
Console.WriteLine($"Customer {transactionData.Customer} bought an item for {transactionData.Value}");

public class TransactionData
{
    public string Customer { get; set; }
    public decimal Value { get; set; }
}

public class TupleExample
{
    public TransactionData GetTransactionData(string data)
    {
        var chunks = data.Split(';');

        return new TransactionData
        {
            Customer = chunks.First(),
            Value = decimal.Parse(chunks[2])
        };
    }
}

This solution is correct in every way. We created a class to represent what we return from a method. Properties are named correctly.
What if we could achieve the same without creating a new class?

Meet tuples

A tuple is a value type that can store a set of data elements. It is a very flexible structure, similar to dynamic types, so you can set names for your properties. Let’s finish talking and jump into code:

var transactionData = new TupleExample().GetTransactionData(Data);
Console.WriteLine($"Customer {transactionData.Customer} bought an item for {transactionData.Value}");

public class TupleExample
{
    public (string Customer, decimal Value) GetTransactionData(string data)
    {
        var chunks = data.Split(';');

        return (chunks.First(), decimal.Parse(chunks[2]));
    }
}

Have you noticed, that I haven’t changed the code that’s using a method GetTransactionData? 😲 It is the change that affects only the method itself, but it just makes it simpler and more concise.

Notice how tuple can be defined:

You can create a tuple with new keyword or with parenthesis.

var tuple = new Tuple<string, decimal>("John", 20);
(string, decimal) tuple2 = ("Anna", 30);
(string Name, decimal Value) tuple3 = ("Cathrine", 40);

Console.WriteLine($"Customer {tuple2.Item1} bought an item for {tuple2.Item2}");
Console.WriteLine($"Customer {tuple3.Name} bought an item for {tuple3.Value}");

You can specify property names, but if you don’t, you can use default names like Item1, Item2, etc.

Summary

A tuple is a simple, dynamic type when we don’t want to create a class for just a single usage. It is flexible and easy to create.

Would it be useful for you? I will give it a try 😀


How to create a NuGet package targeting multiple frameworks

Working with .NET Standard is a pleasure. It’s fun, it’s short, it’s amazingly readable and concise. As a developer, I would like to work only with .NET Core or .NET Standard code. However, sometimes you need to support the old .Net Framework as well. How to create a NuGet package, that can be used by both?

A real-life example

I’m an author and a developer of a simple client for an Egnyte API, which is a private cloud for documents with a ton of features. It is a package, that I created as PCL (Portable Class Library), cause it can support multiple frameworks while still programming in full .Net Framework. 

However recently I was asked to write support for a .Net Standard as well so that it can be used by newer projects. I happily accepted the opportunity and started research around the topic. 

It turned out, that when you need to support multiple frameworks, the preferred way is no longer PCL, but .Net Standard. So that’s what I did. I ported my package to .Net Standard and make it work. Luckily it is a very simple project, so that wasn’t a very hard task. What’s more, if you would like to support multiple frameworks, you just need to list them in your .csproj file.

<Project Sdk="Microsoft.NET.Sdk">

  <PropertyGroup>
    <TargetFrameworks>netstandard2.0;net461</TargetFrameworks>
  </PropertyGroup>

<ItemGroup>
  <PackageReference Include="Newtonsoft.Json" Version="12.0.3" />
</ItemGroup>

</Project>

Notice that I changed TargetFramework to TargetFrameworks and now I can provide a list of frameworks to support. More of targeting multiple frameworks you can read on this Microsoft page.

Why it doesn’t build?

It seems unbelievable easy up to this point, but the truth is that it can get more tricky. When I built my project, I got an exception:

Error CS0234: The type or namespace name ‘Http’ does not exist in the namespace ‘System.Net’ (are you missing an assembly reference?)

System.Net.Http library could not be found, because types that are in this namespace are a part .Net Standard. I didn’t need to import it. However, for .Net Framework 4.6.1 I need to import this package to make my code work. So after some digging, I figured out, I need to modify my .csproj file.

<Project Sdk="Microsoft.NET.Sdk">

  <PropertyGroup>
    <TargetFrameworks>netstandard2.0;net461</TargetFrameworks>
  </PropertyGroup>

   <!--Conditionally obtain references for the .NET Framework 4.6.1 target-->  
  <ItemGroup Condition=" '$(TargetFramework)' == 'net461' ">
    <Reference Include="System.Net.Http" />
  </ItemGroup>
  <ItemGroup>
  <PackageReference Include="Newtonsoft.Json" Version="12.0.3" />
</ItemGroup>

</Project>

Luckily that was the only problem, but you might need to do more if-s and even hacking inside the code with code that would run only for a specific framework.

#if NET40
        Console.WriteLine("Target framework: .NET Framework 4.0");
#elif NET45  
        Console.WriteLine("Target framework: .NET Framework 4.5");
#else
        Console.WriteLine("Target framework: .NET Standard 1.4");
#endif

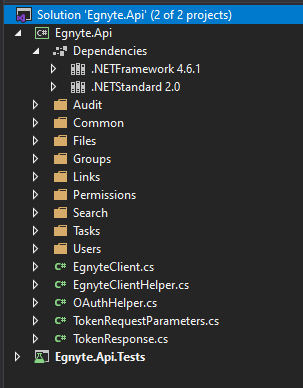
Now my project tree looks like this. As you can see, now in the Dependencies I have two frameworks listed.

Creating a NuGet package

With .Net Standard there is no easier thing to do, then creating a NuGet package. You just need to run a command dotnet pack in your main project folder.

In this case, I needed some more information for a package, like an author and description, so I modified my .csproj file and here is my final version.

<Project Sdk="Microsoft.NET.Sdk">

  <PropertyGroup>
    <TargetFrameworks>netstandard2.0;net461</TargetFrameworks>
    <PackageId>Egnyte.Api</PackageId>
    <Version>2.0.0-alpha1</Version>
    <Authors>Michal Bialecki</Authors>
    <Company>Egnyte Inc.</Company>
    <Description>Egnyte Api client for .net core</Description>
    <GenerateDocumentationFile>true</GenerateDocumentationFile>
  </PropertyGroup>

  <!--Conditionally obtain references for the .NET Framework 4.6.1 target--> 
  <ItemGroup Condition=" '$(TargetFramework)' == 'net461' ">
    <Reference Include="System.Net.Http" />
  </ItemGroup>
  <ItemGroup>
    <PackageReference Include="Newtonsoft.Json" Version="12.0.3" />
  </ItemGroup>

</Project>

One thing worth noticing is <GenerateDocumentationFile>true</GenerateDocumntationFile>, cause it generates XML documentation along with dlls. This is where IntelliSense takes it’s method descriptions from, which is very useful for developers.

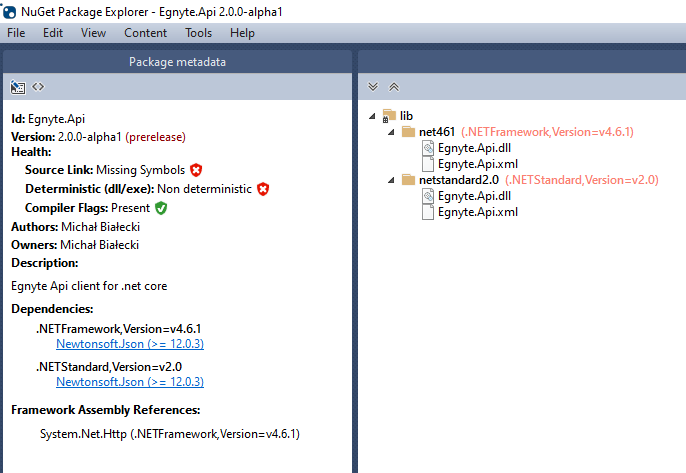
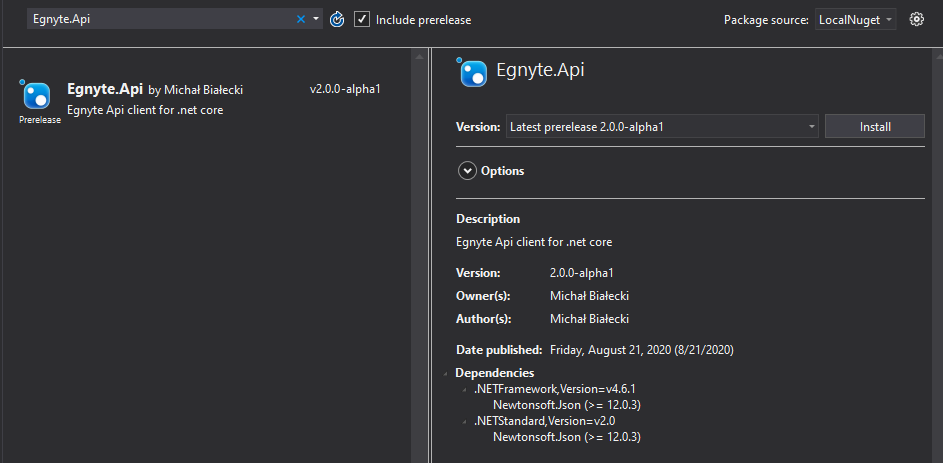
Now if I open my NuGet package in the NuGet Package Explorer, I see something like this:

Now it supports both .Net Standard 2.0 and .Net Framework 4.6.1.

Let’s see how it looks like when installing this package.

Egnyte.Api package includes information about what framework it supports and that it is a prerelease, cause I intentionally set the version to 2.0.0-alpha1. While installing the package NuGet Package Manager will decide which dll is right for you project framework and install the right one. Nice and easy, everything is done automatically!

Summary

Targetting multiple frameworks in .NET Standard is really simple, but it can get harder when using many references and libraries. However, it is worth the pain, cause you could work with .Net Standard instead of old frameworks and projects.

Creating and building a NuGet package is way simpler and you can use all the .Net Standard cool features. You also would be more up-to-date with .Net framework changes.

.Net Standard is the new PCL, a standard for building libraries for multiple frameworks and platforms. Also, NuGet supports having multiple dlls in one package and it chooses the right one for you. If it is done automatically, why not try it out?

All code mentioned here is available in egnyte-dotnet GitHub repository.

Enjoy!

What I learned from $2500 Udi Dahan course

Around the beginning of April 2020 Udi Dahan, owner of Particular Software, released his course in a form of online videos, for free. The big deal is that Udi is one of the world’s foremost experts on Service-Oriented Architecture, Distributed Systems, and Domain-Driven Design. This was a trigger for me and my whole team to watch the course and have a weekly discussion session to talk through completed chapters. Here is what I learned.

Use messaging

In his course, Udi highlighted many times, that messaging can solve most of your service-to-service communication. It may be slower than traditional RPC calls, but it’s more reliable and stable. It also scales better, because it doesn’t really matter how many subscribers there are, but rather how easy we can change the existing architecture.

With RPCs, services are strongly bonded together and need to support the same contract. When the change is needed, we often need to change more than one service. With messaging we can use messages that are already sent and build a service that we need. 

It is also worth mentioning that messaging systems are in the business for a long time and there is a handful of solutions to choose from. It’s not a technology that is still changing quickly, but it’s been here for a while.

There’s no single best solution

This is something that was repeated dozens of times across the course. Udi showed the best available approaches and architectural styles available: RPCs, messaging, micro-services, CQRS, Sagas, and showed their good and bad usages. All those concepts are great, but it doesn’t mean that we should use one of them for everything. It’s actually better to combine a few approaches, technologies, database models and use whatever suits the problem best.

For example, if CQRS works great for one e-commerce solution, it doesn’t mean that now it is the formula for every e-commerce there is. Therefore we shouldn’t take unconsciously whatever worked for previous project without greater analysis.

Find your service boundaries

This was one of the most important chapters and an a-ha moment for me and my teammates. Udi explained how important it is to find the service boundaries – places where a business domain can be divided into smaller pieces. It also defines the best places where big codebase can be divided into smaller, independent services.

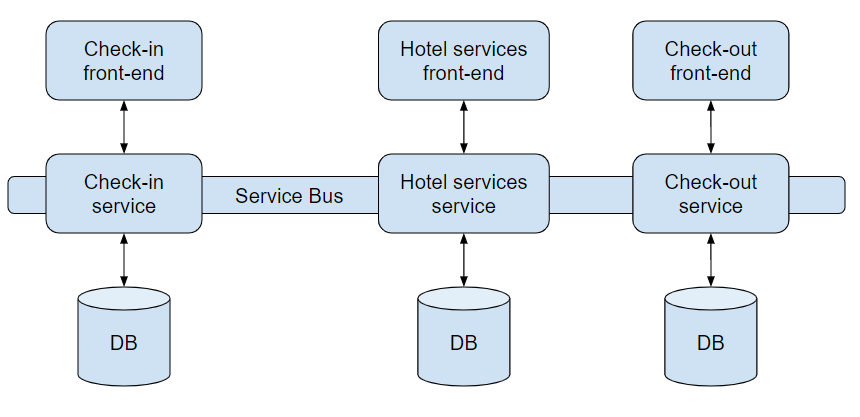
Let’s take a look at the example. Let’s say we are building a hospitality system, that a guest can interact with.

So we have nicely separated micro-services, each with separate front-end and DB. They are communicating via messages in Service Bus and save data they need in DB, in the form they need them. Every change done by the user is saved in DB and propagated via message.

So what’s wrong?

It may seem that it’s a perfect decoupled solution, that can be scaled according to needs. However, there are a few problems. The first one is that we have a lot on infrastructure to maintain: services and databases must have a deployment process and with this approach, we are going to have more and more small services.

The second one is scalability. They seem easy to scale because everything is separate, but in most cases, there will be no need to do so. We will end up using resources we do not need. The other thing is that it’s not easy to maintain many instances of a service, where you have the same database. Stateful services are hard to scale, where stateless services can be scaled easily. Scalable services need to be designed with this specific goal in mind.

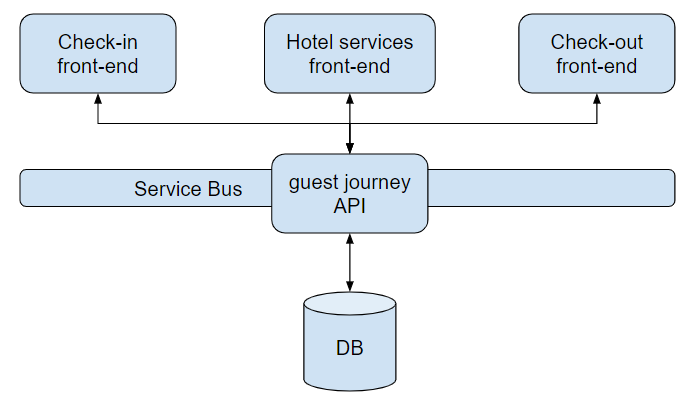
The third and less obvious one is that those services are actually not decoupled. They are working on the same data: user basic data, reservation details, reservation suborders, and payments. We will end up having all those data in every database. Don’t get me wrong, data duplication isn’t a bad thing when it comes to reading. But when a change is necessary, it has to be synchronized with every service that uses this data. Now, let’s have a look at a different approach.

In this approach, we still have separate front-ends but we have a single API and DB. The deployment process is easier, applying a change of contract is also easier, because we can do it all at once and we need much less synchronization. Of course, this is only an example and it wouldn’t fit every scenario, but here it makes sense.

Micro-services approach doesn’t have to be better than the monolith

When looking at an example above, we clearly see that having slightly bigger services can bring certain advantages to our architecture. When building micro-service it is a common pattern, that it should do one thing only. It can lead to services, that would have a single method in their APIs. While it may make sense in some cases, it would result in creating many very small services, that contain more synchronization code, than the actual business logic.

On the other hand, a monolith does not need to be a bad idea. If we can make it performant enough and the codebase isn’t that bad, then it actually has some advantages. For example, introducing a change is far easier and quicker than in many micro-services. Also, we have all business logic and contracts in front of our eyes, where we can easily see it. It’s also easier to write unit tests in the monolith than integration tests with a micro-service approach.

Don’t try to model reality – it doesn’t exist

A very powerful sentence, that Udi said when talking about domain modeling. Although it is said that Object-Oriented Programming should mimic the real world, it doesn’t seem to be the right approach. Let me bring the example that Udi mentioned.

We need to count the amount for transactions that were done this week and the last week. When reflecting that as a real-life model, we would end up having a table of transactions with dates and amounts. Like this:

Then when we need the sum, we would calculate it on the fly. This, of course, would work, but calculating the sum of transactions every time is just a bad idea. If we shift our thinking, we could just have a structure like this:

It doesn’t remind a transaction list from the real-world, but in this case, we simply don’t need it. It will require some maintenance when the week is over, but it will be far less than calculating the sum on every read. 

The summary

Learn Advanced Distributed Systems Design course changed the way I’m thinking about distributed architecture and micro-services. Udi is an amazing speaker, that used his experience from many real-life projects and was able to explain the most complicated concepts in a way that child would understand. 

Although it wasn’t easy to go through 30+ hours of the course, it was a huge dose of knowledge and I would recommend it to anyone.

BTW, here is the link: https://particular.net/adsd

ASP.NET Core in .NET 5 – sending a request

Sending a request in ASP.NET Core in .NET 5 is a standard operation that can be achieved pretty easily. However, details matter in this case and I’ll show you the best practice available. We will also take a look at some advanced features to get the full scope.

Using a real available API

In this article, I will be using 3rd party free service for fetching weather forecasts – http://weatherstack.com. To be able to use it, just register on their website and you can use it as well. 1000 requests in a month are available for a free account and that should be more than enough to fulfill our needs.

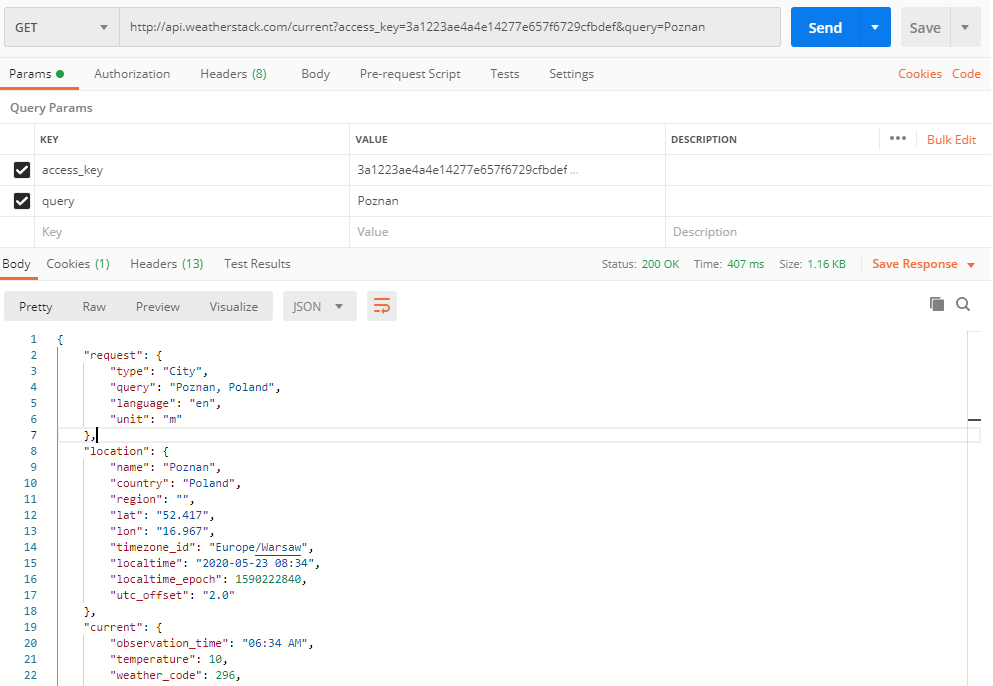
First, let’s have a look at the requests we are going to make. To test the API, I’m using a Postman app, which is very powerful, yet intuitive. I strongly encourage you to read my article about it here: Postman the right way

Here is how a request to fetch current weather in Poznań looks like:

This is a GET request to http://api.weatherstack.com/current with two parameters:

  • access_key which you get when registering on the website
  • query that can be a city name

The response that we got is a 200 OK with JSON content.

 To make this request, I’ll create a WeatherStackClient class.

using Microsoft.Extensions.Logging;
using System;
using System.Net.Http;
using System.Text.Json;
using System.Threading.Tasks;

namespace PrimeHotel.Web.Clients
{
    public class WeatherStackClient : IWeatherStackClient
    {
        private const string AccessKey = "3a1223ae4a4e14277e657f6729cfbdef";
        private const string WeatherStackUrl = "http://api.weatherstack.com/current";

        private HttpClient _client;
        private readonly ILogger<WeatherStackClient> _logger;

        public WeatherStackClient(HttpClient client, ILogger<WeatherStackClient> logger)
        {
            _client = client;
            _logger = logger;
        }
    }
}

There are a few things to notice here:

  • AccessKey which is hardcoded for now, but in a real-life API should be moved to configuration
  • IWeatherStackClient interface that is introduced for Dependency Injection support
  • HttpClient class is passed in a constructor. It will be automatically created and maintained by the framework

Now let’s create the logic.

    public async Task<WeatherStackResponse> GetCurrentWeather(string city)
    {
        try
        {
            using var responseStream = await _client.GetStreamAsync(GetWeatherStackUrl(city));
            var currentForecast = await JsonSerializer.DeserializeAsync<WeatherStackResponse>(responseStream);
            
            return currentForecast;
        }
        catch (Exception e)
        {
            _logger.LogError(e, $"Something went wrong when calling WeatherStack.com");
            return null;
        }
    }

    private string GetWeatherStackUrl(string city)
    {
        return WeatherStackUrl + "?"
                + "access_key=" + AccessKey
                + "&query=" + city;
    }

Let’s go through this code and explain what’s going on:

  • _client.GetStreamAsync is an asynchronous method that takes a URL an returns a stream. There are more methods, like: GetAsync, PostAsync, PutAsync, PatchAsync, DeleteAsync for all CRUD operations. There is also GetStringAsync that serializes a response content to string – just like GetStreamAsync does
  • GetWeatherStackUrl is merging a service URL with query parameters, returning a full URL address
  • JsonSerializer.DeserializeAsync<WeatherStackResponse>(responseStream) deserializes a stream and format output as a WeatherStackResponse class

The WeatherStackResponse class looks like this:

using System.Text.Json.Serialization;

namespace PrimeHotel.Web.Clients
{
    public class WeatherStackResponse
    {
        [JsonPropertyName("current")]
        public Current CurrentWeather { get; set; }

        public class Current
        {
            [JsonPropertyName("temperature")]
            public int Temperature { get; set; }

            [JsonPropertyName("weather_descriptions")]
            public string[] WeatherDescriptions { get; set; }

            [JsonPropertyName("wind_speed")]
            public int WindSpeed { get; set; }

            [JsonPropertyName("pressure")]
            public int Pressure { get; set; }

            [JsonPropertyName("humidity")]
            public int Humidity { get; set; }

            [JsonPropertyName("feelslike")]
            public int FeelsLike { get; set; }
        }
    }
}

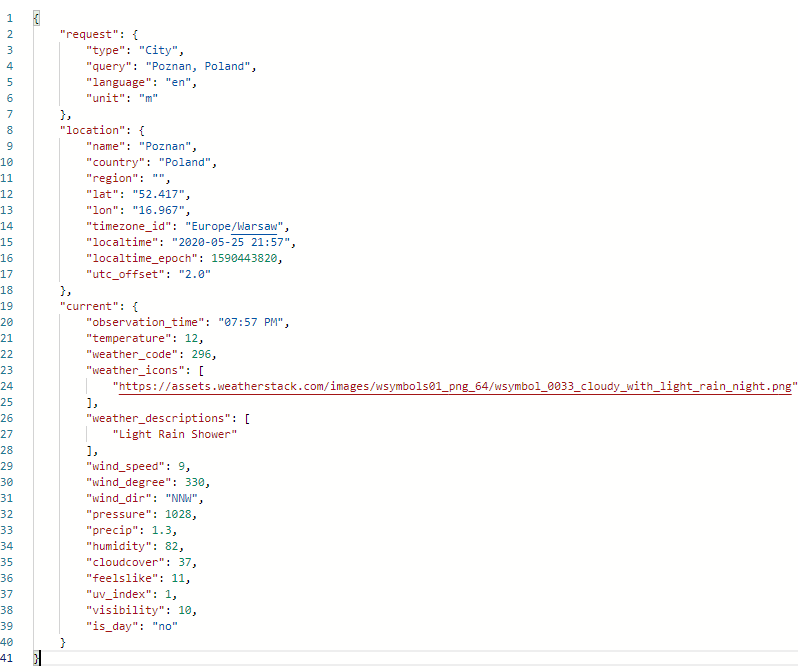
Notice that I used JsonPropertyName attribute to identify what JSON property is each property matching. Here is the structure that we are going to map.

One last thing – we need to register our WeatherStackClient in a Dependency Injection container. In order to do so, we need to go to Startup class and add the following line in ConfigureServices method.

services.AddHttpClient<IWeatherStackClient, WeatherStackClient>();

We are using a dedicated method for registering classes using HttpClient. Underneath it’s using IHttpClientFactory that helps to maintain the pooling and lifetime of clients. You have a limited number of HTTP connections that you can maintain on your machine and if you create too much clients each blocking a connection, you will end up failing some of your requests. It also adds a configurable logging experience (via ILogger) for all requests sent through. All in all, it makes a developer’s life easier and allows you to do some smart stuff too.

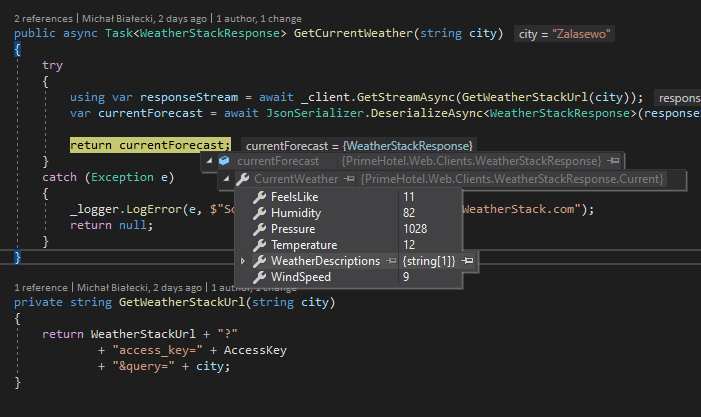
Does it work? Yes it does! The response was correctly mapped into my class and I can return it.

Do you wonder what was logged when making this request? Let’s have a quick look.

As I mentioned earlier IHttpClientFactory also provides a logging mechanism, so that every request is logged. Here you can see that not only address was logged, but also HTTP method and time of execution. This can be pretty useful for debugging.

Adding a retry mechanism

In a micro-services world, every micro-service can have a bad day once in a while. Therefore, we need to have a retry mechanism for services we call and we know that they fail from time to time. In ASP.NET Core for .NET 5 there is a third-party library integrated just that purpose – it’s Polly. Polly is a comprehensive resilience and transient fault-handling library for .NET. It allows developers to express policies such as Retry, Circuit Breaker, Timeout, Bulkhead Isolation, and Fallback in a fluent and thread-safe manner.

For our scenario let’s add a retry mechanism, that will call WeatherStack service and retry 3 times after an initial failure. With Polly, a number of retries and delays between then can be easily set. Let’s have a look at the example – it’s in the Startup method where we configure DI container.

    services.AddHttpClient<IWeatherStackClient, WeatherStackClient>()
        .AddTransientHttpErrorPolicy(
            p => p.WaitAndRetryAsync(new[]
            {
                TimeSpan.FromSeconds(1),
                TimeSpan.FromSeconds(5),
                TimeSpan.FromSeconds(10)
            }));

With this code we will retry the same request after 1, 5, and 10 seconds delay. There is no additional code needed. Polly will do everything for us. We will see logs that something failed, only after all retries will fail, we will get the exception.

Adding a cancellation token

A cancellation token is a mechanism that can stop the execution of an async call. Let’s say that our request shouldn’t take more than 3 seconds, because if it does, we know that something isn’t right and there is no point to wait.

To implement that we need to create a cancellation token and provide that when making a call with an HTTP client.

    public async Task<WeatherStackResponse> GetCurrentWeatherWithAuth(string city)
    {
        try
        {
            using var cancellationTokenSource = new CancellationTokenSource(TimeSpan.FromSeconds(3));

            using var responseStream = await _client.GetStreamAsync(GetWeatherStackUrl(city), cancellationTokenSource.Token);
            var currentForecast = await JsonSerializer.DeserializeAsync<WeatherStackResponse>(responseStream);

            return currentForecast;
        }
        catch (TaskCanceledException ec)
        {
            _logger.LogError(ec, $"Call to WeatherStack.com took longer then 3 seconds and had timed out ");
            return null;
        }
        catch (Exception e)
        {
            _logger.LogError(e, $"Something went wrong when calling WeatherStack.com");
            return null;
        }
    }

If the request takes too long, we will receive a TaskCancelledException, which we can catch and react to it differently, that when getting unexpected exception.

Provide authorization

Basic authorization is definitely the simplest and one of the most popular ones used. The idea is that every request to the specific service needs to be authorized, so that along with our content, we need to send authorization info. With basic authorization, we need to pass a user and password encoded as base64 string and put in a request header. Let’s see how that can be accomplished. 

    private const string ApiKey = "3a1223ae4a4e14277e657f6729cfbdef";
    private const string Username = "Mik";
    private const string Password = "****";

    public WeatherStackClient(HttpClient client, ILogger<WeatherStackClient> logger)
    {
        _client = client;
        _logger = logger;

        var authToken = Encoding.ASCII.GetBytes($"{Username}:{Password}");
        _client.DefaultRequestHeaders.Authorization = new AuthenticationHeaderValue(
            "Basic",
            Convert.ToBase64String(authToken));
    }

In this way every call from WeatherStackClient will have authorization info and we do not need to add anything when we make requests. The only place we need to put additional code is a constructor.

Note that authorization is not needed to call weatherstack.com and is added only to show how it can be done.

This article did not cover all of the possibilities of IHttpClientFactory so if you want to know more, just go to this Microsoft article.

Hope you like this post, all code posted in this article is available at my GitHub account:

https://github.com/mikuam/PrimeHotel